 StainList
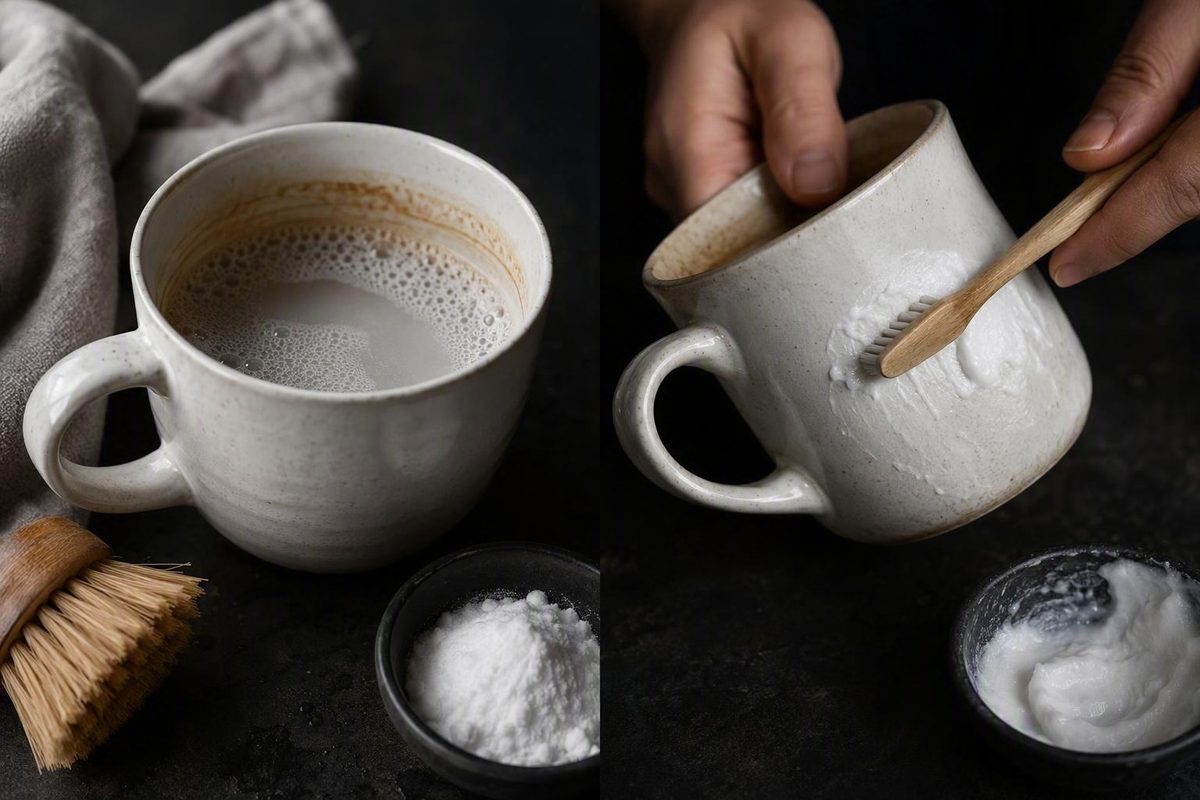
The least-aggressive way to clean a tea-stained mug is to begin with a warm dish-soap soak, inspect the surface, and use a small baking-soda paste only if the brown film remains. Diluted vinegar or a label-compatible soaking tablet can be considered later, depending on the mug’s material and care instructions.
These methods are synthesized from third-party household guidance, personal tests, and community reports. They are conservative starting points—not guarantees for every stain, glaze, coating, decoration, or mug construction.
Quick answer: start with soap, then try a baking-soda paste
Use this decision path:
- Add a few drops of dish soap to the mug.
- Fill it with very warm—not boiling—water.
- Let it soak for 5–10 minutes.
- Wipe the stained area gently with a soft cloth or non-abrasive sponge.
- Rinse and inspect the mug under good light.
- If a brown film remains, make a paste with about 1 teaspoon of baking soda and a few drops of water.
- Apply the paste with a soft, damp cloth and rub lightly for 1–2 minutes.
- Rinse away all powder, then wash the mug normally with dish soap before using it again.
The soap-soak time, approximate baking-soda quantity, and short rubbing time follow published mug-cleaning guidance, but compatibility still depends on the individual mug (dish-soap and baking-soda instructions from Promotional Product Inc.).
Inspection matters more than force. After the initial soap soak, rinse the mug and look at it rather than immediately scrubbing harder. If the ring has faded substantially, another gentle wipe may be enough. If the cleaned area has become dull, rough, scratched, discolored, or otherwise altered, stop.
Do not assess the result while baking soda still coats the surface. A thin white film can hide both remaining brown residue and changes to the finish. Rinse thoroughly, wash with dish soap, and inspect the mug after it drains or dries.
An intact, undecorated glazed mug is different from fine china, a metallic-trimmed cup, hand-painted pottery, a coated travel mug, or a mug with crazing or chips. Check the manufacturer’s care instructions before using an abrasive powder, an acid, a prolonged soak, or unusually hot water.
Why tea leaves a brown film inside mugs
Tea contains compounds commonly called tannins, which are associated with the familiar brown discoloration that develops on frequently used cups and mugs. Repeatedly leaving small amounts of tea to dry can make that film increasingly visible (Good Housekeeping’s explanation of tannins and tea staining).
It is still more accurate to describe the mark as accumulated residue than to assume every brown or black area has the same composition. A mug also used for coffee may collect oils, while hard-water deposits may contribute to cloudy, pale, brownish, or uneven buildup. Appearance alone cannot conclusively identify the material on the surface.
Routine washing may remove fresh liquid and loose residue without lifting a film accumulated over many uses. That does not automatically mean a stronger chemical is needed.
Prompt rinsing helps by carrying away tea before the remaining liquid dries. If a complete wash is inconvenient, empty the mug, rinse it with water, and wash it properly later. This may reduce buildup, although it cannot prevent every future stain.
A brown ring is not, by itself, proof that a mug contains harmful bacteria or is unsafe. Color alone cannot diagnose hygiene conditions, and removing a visible stain is not the same as sanitizing drinkware.
Surface condition also changes how discoloration behaves. Persistent staining in such areas cannot be diagnosed from appearance alone.
Choose the treatment by stain severity
Match the treatment to what remains after the initial dish-soap soak.
| Condition | Starting treatment | Contact time | Tool | Next step |
|---|---|---|---|---|
| Light ring or thin film | A few drops of dish soap and very warm water | 5–10 minutes | Soft cloth or non-abrasive sponge | Wipe, rinse, and inspect |
| Moderate brown film | Paste of about 1 teaspoon baking soda and a few drops of water | Rub gently for 1–2 minutes | Soft, damp cloth | Rinse thoroughly and wash normally |
| Moderate stain that resists immediate treatment | Apply a fresh baking-soda paste and let it rest | 5–10 minutes before gentle rubbing | Soft, damp cloth | Rinse, wash, and reassess |
| Widespread surface buildup | Baking soda dispersed in warm water | Several hours, with periodic checks | Soft sponge or bottle brush after soaking | Rinse and wash; repeat cautiously only once |
| Old or uncertain discoloration | Reassess the material and finish before escalating | No automatic extension | None until compatibility is checked | Consider diluted vinegar or a label-approved soaking product |
The first two rows reflect published short soap-soak and baking-soda methods. Guidance for more persistent staining progresses to a 5–10 minute paste treatment or a soak lasting several hours, although the available sources do not establish a universally successful schedule (severity-based baking-soda guidance from Tipnut; short soap and paste instructions).
Light film
Let the warm soapy water sit for the specified period, then wipe around the interior with a soft cloth. Pay attention to the lower corners and the transition between the base and wall, where a flat sponge may not make even contact.
Rinse completely and inspect the mug while wet and again after it drains. Reflections from water can make a thin film difficult to see, so use good light.
Moderate buildup
If the soap soak leaves a visible brown film, mix the baking soda with only enough water to form a damp paste. Move the cloth lightly over the stain instead of pressing hard.
If the first application does not lift the residue, rinse and inspect. Provided the mug has an ordinary intact finish and its care instructions do not prohibit the treatment, apply fresh paste and let it rest briefly before wiping gently.
Do not keep adding powder to the same drying paste. Rinse between attempts so you can see whether the surface is improving or becoming dull.
Widespread or heavy film
For a broad coating rather than a defined ring, disperse baking soda in warm water and fill the mug above the affected area. Let it soak for several hours, checking periodically. A soft bottle brush may help afterward if the mug is narrow.
There is no need to default to an overnight treatment. Periodic inspection allows you to stop when the residue softens and avoids unnecessary contact with an unknown finish, seal, adhesive, or plastic component.
After rinsing and washing, make no more than one careful repeat of the selected gentle method before reassessing the mug. If little changes, do not increase pressure, temperature, chemical strength, and soak time all at once.
Older discoloration may improve only partially. The available evidence consists mainly of publisher instructions, personal trials, and community reports rather than controlled comparisons across mug finishes, teas, water conditions, or stain ages. No supplied source establishes a method that removes every old mark.
At any stage, stop if the treated area becomes dull, rough, scratched, discolored, or visibly different from the surrounding surface.
Alternatives for stubborn stains and narrow mugs
If a careful baking-soda treatment does not help, diluted white vinegar is an alternative, not necessarily a stronger or more effective next step.
For an ordinary mug whose manufacturer permits acidic cleaning:
- Mix approximately equal parts distilled white vinegar and warm water.
- Add enough solution to cover the stain.
- Let it sit for about 10 minutes.
- Empty the mug and inspect the surface.
- Wipe gently with a soft cloth, non-abrasive sponge, or soft bottle brush.
- Rinse thoroughly.
- Wash normally with dish soap before reuse.
A personal homekeeping test used a half-water, half-vinegar soak for approximately 10 minutes before wiping and rinsing (The Creek Line House vinegar method). Other household guides recommend longer contact, but that variation is a reason to begin conservatively—not evidence that the longest soak is best.
If the surface remains unchanged after the initial treatment and the manufacturer permits vinegar, extend the soak in stages and inspect between extensions. Avoid assuming that acidic cleaning is suitable for metallic decoration, aluminum, coatings, painted finishes, seals, adhesives, damaged glaze, or unknown materials.
Results vary. In one community question about a narrow mug believed to have a stainless-steel interior and a heavy dark coating, the owner reported that vinegar did not help. Contributors suggested several other soaking products, but those suggestions were user reports rather than controlled tests (Seasoned Advice discussion of heavy buildup in a steel-lined mug).
A failed vinegar soak does not identify the residue and does not justify moving automatically to harsher chemistry.
For a narrow travel mug that is difficult to reach, a denture-cleaning tablet may be practical only when:
- The product label permits the intended food-contact cleaning use.
- The mug manufacturer permits that cleaner for the interior and every exposed component.
Follow the tablet label for quantity, water temperature, contact time, handling, and rinsing. Do not substitute a universal recipe because formulas and instructions vary. If the label requires particular ventilation or handling measures, follow them.
After soaking, empty the mug, use a soft bottle brush if permitted, rinse as directed, and complete a normal dish-soap wash. Clean removable lids, seals, valves, and other components according to their separate care instructions.
Keep vinegar and baking soda as separate treatments. Separation also makes it easier to tell whether mild abrasion or an acidic soak is helping.
Check the mug material before cleaning
“Mug” describes many different constructions. A plain glazed ceramic cup, thin porcelain teacup, painted souvenir mug, and vacuum-insulated travel mug should not automatically receive the same treatment.
| Material or feature | Conservative starting approach | Main cautions |
|---|---|---|
| Ordinary intact glazed ceramic | Warm dish-soap soak; careful baking-soda paste if needed | Stop if the glaze dulls, scratches, or changes color |
| Ordinary intact porcelain | Warm dish soap; lightly applied baking-soda paste if compatible | Thin or decorated porcelain may require gentler handling |
| Glass | Warm dish-soap soak and soft wiping | Avoid sudden temperature changes and aggressive pads |
| Stainless steel | Soak before scrubbing; use a soft cloth, sponge, or bottle brush | Steel wool and harsh scourers can leave scratches |
| Fine bone china | Warm dish soap; consult maker guidance before powders or acids | Avoid boiling water, abrasion, abrupt heat changes, and unapproved long soaks |
| Metallic trim or paint | Warm dish soap and a soft cloth | Avoid acids and abrasives unless specifically permitted |
| Decals, printing, or paint | Spot-test and clean gently | Decoration may fade, lift, or scratch |
| Plastic components | Follow the mug manufacturer and cleaner label | Heat, acids, and prolonged soaking may affect plastics differently |
| Aluminum | Use aluminum-specific care instructions | Do not transfer stainless-steel methods automatically |
| Cracked or crazed glaze | Stop before prolonged soaking or chemical escalation | Cleaner may enter damaged areas |
| Unglazed or porous ceramic | Seek maker or specialist guidance | Liquids and cleaners may enter the ceramic body |
| Antique, repaired, hand-painted, or unknown finish | Inconspicuous spot test and specialist guidance | Materials, decoration, repairs, and previous treatments may be unknown |
Glazed ceramic, porcelain, and glass
For an ordinary mug with an intact, glossy, undecorated surface, warm dish soap and a carefully applied baking-soda paste are reasonable starting options. They are not universal guarantees. Glaze composition, age, decoration, previous wear, and care instructions differ among mugs that appear similar.
Use a soft cloth first. Before treating a favorite or valuable mug, test a small, inconspicuous area. Rinse and dry the test spot before deciding whether the finish has changed; a dull patch may be difficult to see while wet.
Stainless steel and travel mugs
Use a soft sponge, cloth, or bottle brush rather than steel wool or an aggressive scouring pad.
Treat the parts of a travel mug separately. The interior may be stainless steel while the exterior is painted or powder-coated. The lid may contain plastics, silicone seals, valves, springs, or adhesives with different care restrictions.
Check whether each component may be soaked, brushed, or placed in a dishwasher. Do not assume that a treatment suitable for the steel body is suitable for the lid or exterior.
Fine china, decoration, and temperature-sensitive mugs
Favor warm rather than boiling water for fine china, metallic decoration, repaired ceramics, and other temperature-sensitive drinkware. Published material guidance likewise recommends warm water for fine or metallic-finished mugs and soft tools for stainless steel to limit thermal-shock and scratching risks.
For painted, hand-decorated, metallic-trimmed, antique, repaired, or unknown finishes, test an inconspicuous area before applying vinegar, baking soda, a packaged cleaner, or a prolonged soak. If the mug is valuable or irreplaceable, ask the manufacturer, potter, conservator, or another appropriate specialist rather than experimenting with increasingly abrasive treatments.
Aluminum, plastic, and mixed materials
Do not transfer stainless-steel instructions automatically to aluminum or plastic. A community method involving very hot water and detergent was explicitly limited to stainless steel and warned against applying it to aluminum or some plastics.
Mixed-material mugs require component-by-component care. Even if the interior tolerates a treatment, the exterior coating, handle, lid, seal, or adhesive may not.
Cracked, crazed, unglazed, or porous ceramics
A structural crack may penetrate more deeply, while a chip or unglazed area exposes a different surface. Discoloration following those features may not be an ordinary removable film.
Community advice on cleaning cracked-glaze cups is inconsistent. Suggestions range from baking soda and household cleaners to avoiding detergent because it may enter the cracks; some contributors also regard coloration as part of the ware’s aging. These reports do not establish a universally safe restoration method (Seasoned Advice discussion of staining in cracked glaze).
Do not assume staining in cracks is harmless, removable, or proof that the mug must be discarded. Stop soaking and seek material-specific guidance if the mug has structural cracks, exposed porous areas, flaking glaze, or significant sentimental or monetary value.
Cleaning mistakes that can damage a mug or create a chemical hazard
A remaining stain is generally preferable to a permanently scratched finish. Avoid these common mistakes.
Do not use steel wool, aggressive scouring pads, or forceful scrubbing. These tools can mark glossy glaze, stainless steel, paint, printed decoration, coatings, and metallic trim. Soak first and use the least pressure that moves the residue.
Do not assume a household powder is non-scratching. These materials may dull or scratch a vulnerable finish, particularly when used dry or with heavy pressure.
Do not pour boiling water into cold, fine, cracked, repaired, or temperature-sensitive drinkware. Begin with warm water unless the manufacturer permits higher temperatures. Place the mug on a stable surface and follow the manufacturer’s handling instructions for hot liquids.
Never mix bleach with vinegar, lemon, another acid, ammonia, or other cleaning products. Household mug-cleaning guidance specifically warns against combining bleach with vinegar or other cleaners (Tipnut’s cleaner-mixing warning). This article does not provide routine bleach instructions because universal compatibility with drinkware materials, decoration, seals, coatings, and damaged glaze has not been established.
Do not use toilet-bowl cleaner or another product that is not intended for food-contact drinkware. A product’s ability to alter a stain does not make it appropriate for a drinking surface.
Treat dishwasher detergent, sodium percarbonate, oxygen cleaners, commercial cleansers, and denture products as label-dependent options, not universal household remedies. Confirm that the product is intended for the use and compatible with the mug. Follow its label for dilution, water temperature, contact time, required handling, and rinsing.
Do not assume dishwasher instructions for one brand or material apply to another. For example, one retailer’s dishwasher guidance is framed specifically around its fine bone china and stoneware, including conditions for cycle, detergent, load, and temperature—not all mugs (Sophie Allport’s material-specific care guidance).
Keep packaged cleaners in their original containers. Do not combine treatments or transfer a cleaner into an unlabeled food or drink container.
Troubleshooting stains that remain
Use the symptom—not frustration—to decide what to do next.
-
A faint ring remains: Repeat the same gentle soap or baking-soda treatment once. A second short treatment may lift softened residue without the added risk of a harsher cleaner.
-
A thick dark coating remains: Verify whether the surface is stainless steel, coated metal, ceramic, plastic, or another material. Vinegar may fail on a heavy coating. Community contributors have reported stronger soaking agents for stainless steel, but those reports are not controlled evidence. Use only a product whose label permits the intended food-contact cleaning and whose manufacturer confirms compatibility with the mug.
-
White or powdery residue remains: Rinse repeatedly, wipe with a clean soft cloth, and complete a normal dish-soap wash. Inspect after the mug dries before deciding whether the original brown stain remains.
-
The interior is too narrow to reach: Use a soft bottle brush designed for drinkware and a manufacturer-approved soak. Do not insert cutlery, pebbles, loose abrasive objects, metal brushes, or improvised scrubbers that may strike or scratch the interior.
-
The surface feels rough: Stop. Roughness might reflect remaining residue, existing wear, a chip, exposed ceramic, corrosion, or finish damage, but touch alone cannot identify the cause. Further abrasion may enlarge the affected area.
-
Discoloration follows crack lines: Stop prolonged soaking and chemical escalation. The color may be within crazing or another porous area rather than on the accessible surface.
-
The finish looks newly dull: Rinse away the cleaner, wash gently, dry the mug, and compare the treated patch with an untreated area. Do not scrub the rest of the mug in an attempt to make the finish look uniform.
A practical stopping rule is one treatment, inspection, and no more than one careful repeat. If that fails, reassess the material rather than simultaneously increasing heat, contact time, chemical strength, and abrasion.
The available evidence cannot determine whether persistent discoloration remains on the surface or is embedded in damaged glaze or porous ceramic. It also cannot establish from a photograph or unsuccessful cleaning attempt whether damaged drinkware remains suitable for use. Those questions require material-specific assessment.
Prevent tea stains from building up again
The easiest time to remove tea residue is before it repeatedly dries into a visible film.
- Empty and rinse the mug promptly after finishing the drink.
- If a full wash must wait, leave the mug rinsed rather than holding a small amount of tea.
- Wash regularly with dish soap and a soft cloth or non-abrasive sponge.
- Avoid allowing repeated layers of tea to dry in the mug when practical.
- Inspect frequently used mugs for a light film and address it before a long soak becomes necessary.
- Dry or drain the mug according to its care instructions.
- Follow the manufacturer’s dishwasher guidance for the body, exterior, lid, and seals.
Prompt rinsing is recommended because it removes residue before it dries, although it cannot guarantee that every future mark will be prevented (Good Housekeeping’s prompt-rinsing recommendation).
For a travel mug, disassemble only the parts the manufacturer identifies as removable. Clean each component using the tools and temperatures permitted for that part.
Routine gentle care is preferable to infrequent aggressive cleaning.
Frequently asked questions
Can baking soda scratch a mug?
Yes. Baking soda is often described as a gentle household cleaner, but it still provides mechanical abrasion.
Use a damp paste, soft cloth, light pressure, and short treatment. Test an inconspicuous area first, then rinse and dry it before assessing the result. Stop if the surface becomes less glossy, rough, scratched, or visibly different.
Do not add salt or switch to an aggressive pad for extra scrubbing power. That increases abrasion without guaranteeing better stain removal.
How long should vinegar sit in a tea-stained mug?
Begin with approximately equal parts distilled white vinegar and warm water for about 10 minutes. Then empty the mug, inspect it, wipe gently with a soft tool, rinse thoroughly, and wash normally. A commercial coffee-and-tea guide also specifies a 10-minute vinegar treatment followed by rinsing and washing, although its broader material compatibility was not established (Cafe Du Monde’s vinegar-soak instructions).
Some household instructions recommend much longer soaking. Extend the treatment only if the mug manufacturer permits acidic cleaners and the initial soak causes no finish change.
Do not automatically use a long vinegar soak on metallic trim, aluminum, painted or hand-decorated surfaces, unknown coatings, damaged glaze, lids, seals, or plastic components.
Should I mix baking soda and vinegar to remove tea stains?
No. Use them as separate treatments.
Baking soda can be applied as a mildly abrasive paste, while diluted vinegar provides an acidic soak. Mixing them causes fizzing, but the supplied evidence does not establish that the combined mixture cleans tea residue better than either treatment used separately.
Separate use also provides better control. You can rinse and inspect after the baking-soda treatment, then decide whether a compatible vinegar soak is warranted.
Can a denture tablet clean a stainless-steel travel mug?
Possibly. Denture tablets are suggested in several household and community sources as soaking treatments for narrow mugs, but suitability depends on the product formula and the mug’s construction.
Use one only if the tablet label permits the intended use and the mug manufacturer allows it for the stainless-steel interior and all exposed components. Follow the label—not a generic recipe—for quantity, water temperature, contact time, handling, and rinsing.
After treatment, rinse as directed, use a soft bottle brush if permitted, and complete a normal dish-soap wash. Do not assume the same soak is suitable for a painted exterior, plastic lid, silicone seal, valve, spring, or adhesive.
What if the brown marks are inside cracks in the glaze?
Stop treating the marks as an ordinary surface stain. Cleaner may enter crazed, cracked, chipped, unglazed, or porous areas, and further soaking or scrubbing may not remove discoloration below the intact surface.
Community guidance for cracked-glaze cups is inconsistent and does not establish a method that both removes every stain and preserves every glaze. It also cannot determine whether a particular damaged mug remains suitable for continued use.
For valuable, antique, handmade, repaired, or structurally damaged ware, ask the manufacturer, potter, conservator, or another ceramics specialist. Do not assume the discoloration is harmless, but do not conclude from color alone that the mug must be discarded.
The least-aggressive approach, in brief
Start with a 5–10 minute warm dish-soap soak, rinse, and inspect. If a surface film remains, use a small damp baking-soda paste with a soft cloth and light pressure. Treat diluted vinegar or a label-compatible denture tablet as alternatives—not guaranteed upgrades.
Check the mug’s material and care instructions, keep different treatments separate, rinse thoroughly, and complete a normal dish-soap wash before reuse. If a treatment and one careful repeat do not help—or the finish becomes dull, rough, scratched, or discolored—stop and reassess the mug rather than scrubbing harder. Prompt rinsing after future cups of tea is the simplest way to limit recurring buildup.